
Content
This page is a personal Linux command lookup sheet. It now also includes the older Linux blog notes.
Links
Shell Basics
Basic Commands
man <command>: show the manual page for a command.mv <src> <dst>: move a file or directory.rm <path>: remove a file or directory.cat <file>: print file content.fg: resume a paused process in the foreground.bg: continue a paused process in the background.jobs: list jobs started from the current shell.touch <file>: create an empty file or update its timestamp.chmod +x <file>: make a file executable.
Shell Tips
- Use
*to match multiple characters and?to match one character. Ctrl+D: exit the shell.Ctrl+Z: suspend the current foreground process.echo "content" > file: overwrite a file.echo "content" >> file: append to a file.grep "pattern" file: search for a pattern.sed -i "/pattern/d" file: delete matching lines in place.
Nano
Ctrl+X: exit.Ctrl+G: open help.Ctrl+K: cut a line.Ctrl+U: paste a line.Ctrl+W: search.Ctrl+Y/Ctrl+V: previous / next page.Ctrl+A/Ctrl+E: line start / line end.
Shell Scripting
# variables
echo "$VAR"
expr "$VAR1" + "$VAR2"
read VAR

# conditional
if [ condition ]; then
  echo "true"
else
  echo "false"
fi

# loop
for VAR in $LIST; do
  echo "$VAR"
done
Installation
Conda
conda create -n myenv python=3.8      # create a new env
conda remove -n myenv --all           # delete the whole env
conda create -n new_env --clone old_env
conda env update -f requirement.yml
PyTorch, Torchvision, Python
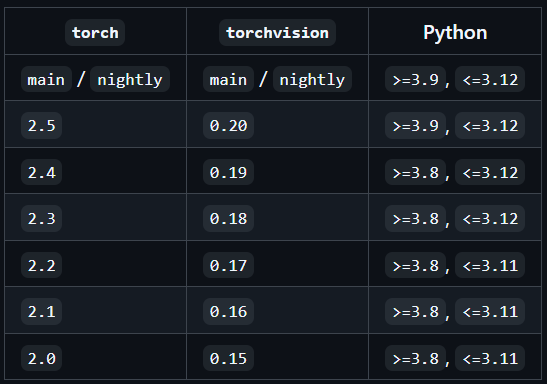 |
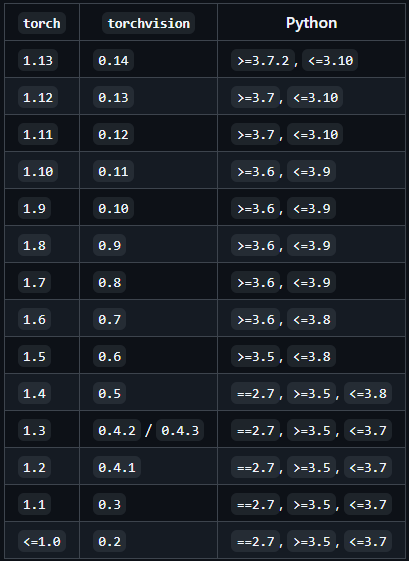 |
- NVIDIA driver: open
Software & Updates, then use theAdditional Driverstab. - Install torch / torchvision / torchaudio with a specific CUDA wheel index:
pip install torch torchvision torchaudio --extra-index-url https://download.pytorch.org/whl/cu128- Install a local wheel:
pip install package.whl- Temporary PyPI mirror:
pip install package_name -i https://pypi.tuna.tsinghua.edu.cn/simple- Global PyPI mirror:
pip config set global.index-url https://mirrors.cloud.tencent.com/pypi/simpleVenv
python3 -m venv venv
source venv/bin/activate
deactivate
AppImage
chmod a+x *.AppImage
./*.AppImage
Desktop Shortcut
Create a .desktop file under ~/.local/share/applications/:
[Desktop Entry]
Name=Another Redis Desktop
Comment=Another Redis Desktop
Exec=/opt/Another_Redis_Desktop/Another-Redis-Desktop-Manager.1.5.6.AppImage
Icon=/opt/Another_Redis_Desktop/ard.png
Terminal=false
Type=Application
Categories=Developer;
App Notes
- Zotero: run
./set_launcher_icon, then link the generated desktop file:
ln -s /path/to/zotero/zotero.desktop ~/.local/share/applications/zotero.desktop- Zotero WebDAV can use Jianguoyun:
https://dav.jianguoyun.com/dav/. - QQ Music sandbox workaround:
qqmusic --no-sandboxSystem & Terminal
- Supervise GPU usage:
watch -n 10 nvidia-smi- Look for proxy:
env | grep -i proxy- Check system architecture:
uname -m- Install / uninstall a
.debpackage:
sudo dpkg -i package_name.deb
sudo dpkg -r package_name- Show Python interpreter path:
import sys
path = sys.executable
print(path)- Set proxy in
~/.bashrcor~/.zshrc, thensource ~/.bashrcorsource ~/.zshrc:
export https_proxy=http://proxy-host:port
export http_proxy=http://proxy-host:port
Unpack Files
cat event.tar.gz.part-* > event.tar.gz
tar -xvf archive.tar
tar -xzvf archive.tar.gz
tar -xjvf archive.tar.bz2
unzip archive.zip -d /path/to/directory
unrar e archive.rar
Download From URL
aria2c -s 10 -x 10 "URL"-s is the split count, and -x is the number of connections per server.
Install / Uninstall Apps
sudo apt remove <package_name>  # remove app only
sudo apt purge <package_name>   # remove app and configuration files
Terminal Sessions
Nohup
Run a script in the background:
nohup /root/runoob.sh &The output is written to nohup.out by default.
Find and kill the process:
ps -aux | grep "runoob.sh"
kill -9 <PID>
Tmux
vim ~/.tmux.conf
tmux source-file ~/.tmux.conf
tmux new -t session_name
tmux ls
tmux kill-window -t session_name- Detach window:
Ctrl+B, thenD.
Zellij
ctrl-p + d: create a pane below.ctrl-p + r: create a pane on the right.ctrl-p + x: close current pane.ctrl-q: quit Zellij.
Python
python -c "print('Hello from command line')"
python -c "import torch; print(torch.cuda.is_available()); print(torch.__version__)"
python -m pip install package_name
python main.py -h
Docker
Docker installation and ROS container setup moved to Docker Setup.
Common commands:
docker images
docker rmi <REPOSITORY:TAG>
docker run --rm -it <IMAGE_ID> /bin/bash
docker ps
docker ps -a
Git
Basic Usage
git status
git add filename.txt
git add .
git commit -m "commit message"
git commit -am "commit message"
git push -u origin new_branch
Failure With Git Connection
If port 22 is blocked, use SSH over port 443:
textHost github.com
    Hostname ssh.github.com
    Port 443
    User git
Put the block in ~/.ssh/config.
Set Username And Email
git config --global user.name "Tesla-SHT"
git config --global user.email "you@example.com"
For private repositories, use a username and PAT instead of a password.
Remote & Local Branch
- Pull a remote branch to local:
git checkout -b branch origin/branch- Delete a local branch:
git checkout another_branch
git branch -D branch
Checkout, Switch, Restore
checkout can both move branches and restore files. switch and restore split those ideas more clearly.
# checkout
git checkout develop
git checkout -b new-feature
git checkout <commit-hash>
git checkout -- a.txt
git checkout HEAD -- a.txt

# switch
git switch develop
git switch -c new-feature
git switch -

# restore
git restore a.txt
git restore --staged a.txt
git restore --source=HEAD a.txt
Merge One Branch To Another
git pull --rebase: fetch remote commits and replay local commits after them.git push: push current branch.git checkout dev: switch todev.git merge main: mergemainintodev.
Modify The Latest Commit
git reset --soft HEAD^
git reset --hard HEAD~1
git commit --amend
Use git reset --hard only when you intentionally want to discard local changes.
Submodule Tracking
Sometimes a submodule may not be tracked as expected.
- Remove the original tracking:
git rm --cached <file-or-dir>- Delete the
.gitfile in the submodule and delete the related file under the root.gitdirectory if it exists. git addthe file again.
CUDA
Assign Process To GPU
CUDA_VISIBLE_DEVICES=0 python main.py
export CUDA_VISIBLE_DEVICES=0
import os
os.environ["CUDA_VISIBLE_DEVICES"] = "0"import torch
torch.cuda.is_available()
torch.cuda.device_count()
torch.cuda.get_device_name(0)
torch.cuda.current_device()VSCode
Python Interpreter
Ctrl+Shift+P: open command palette.- Choose
Python: Select Interpreter.
Shortcuts
Ctrl+K Ctrl+S: open keyboard shortcuts.Ctrl+Shift+F: global search.Ctrl+P: quick open.Ctrl+Shift+G: source control.Ctrl+Shift+D: debug.Ctrl+K M: select language mode.Ctrl+Alt+N: run code with Code Runner.Alt+Z: toggle word wrap.Ctrl+Shift+P: command palette.
Regular Expression Table
| Basic Syntax | Quantifiers | Position | Group | Common Usage |
|---|---|---|---|---|
Any digit: \d |
Zero or more: * |
Start of line: ^ |
(abc) group, use $1 in replace |
Empty line: ^\s*$ |
Word character: \w |
One or more: + |
End of line: $ |
[abc] matches one of a, b, c |
Comments: //.* |
Whitespace: \s |
Zero or one: ? |
Word boundary: \b |
a|b matches a or b |
Quoted text: "[^"]*" |
Any character: . |
Exact count: {n} |
Escape regex metacharacters such as dot, star, plus, question mark, brackets, pipe, and backslash. |
Add SiliconFlow Model
- Install an OAI-compatible extension.
- Set the OAI base URL to
https://api.siliconflow.cn/v1. - Add an OAI model in Copilot or Cline.
Desktop Environment
Xfce
If X server already running on display :0 appears, run:
exec startxfce4Modify lockscreen time:
Section "ServerFlags"
    Option "BlankTime" "0"
    Option "StandbyTime" "0"
    Option "SuspendTime" "0"
    Option "OffTime" "0"
EndSection
Errors
Some Text Is Missing In GNOME
Restart GNOME Shell:
- Press
Alt+F2. - Type
r. - Press
Enter.
dpkg: error: dpkg frontend lock is locked by another process
ps -e | grep apt
sudo kill <PID>